Edit Grub2 Boot Options Easily on Ubuntu 11.04

Friday, June 17, 2011

2 comments
A few months back I shared my discovery about editing boot options in Grub2 and how there was a different way to edit the boot options on menu.lst safely. I blogged about that in this post: Missing Your menu.lst? You've Got Grub2!

Having re-installed Ubuntu recently, I wanted to document how to do it within a GUI environment with mouse-click ease. Well, not really. I mean, you do have to type in a few things to actually download the app you need to do the boot options editing for you. But, it is easy and it is inside the picture-pretty interface. No terminal commands are involved and there were no animals harmed during the making of this HowTo. So enough of the dry wit and let's get to it:

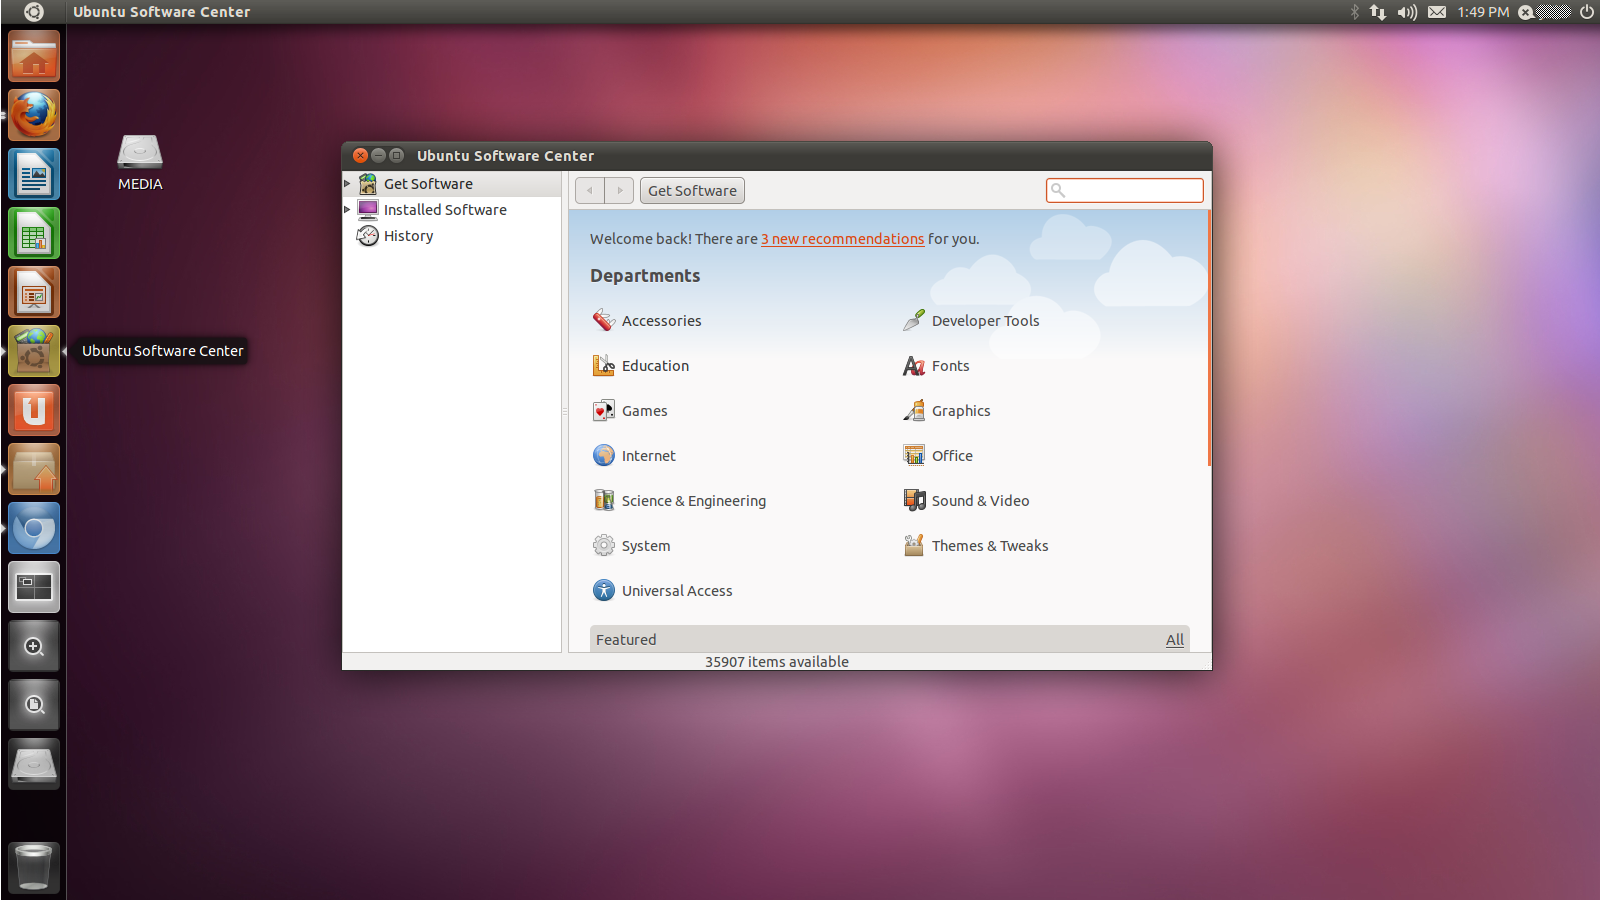
1. First, you need to download StartUp-Manager. The easiest way to do that is through the Ubuntu Software Center. You can click on the icon on the sidebar in Ubuntu 11.04:


2. Next, use the Search box in the Ubuntu Software Center to find the software you need. You can simply type in "StartUp" and Search will give you choices. StartUp-Manager is usually the first one:


3. Click on the entry for StartUp-Manager to select it. Once you click on the Install button, you'll be asked for your password:


4. Key in your password to authorize the install:


5. You'll be able to check on the progress of the download while it is running: 


6. After it is installed, where do you find it? Unlike previous versions on Ubuntu, where clicking on the Ubuntu logo will bring up a list of applications, 11.04 brings up a Search box instead of a huge list. I'm not a fan of it, but this may be easier for some people. Type in "Start" or "Startup" in Search and you should see StartUp-Manager listed first. Click on the icon to launch:


7. StartUp-Manager will perform a few tasks in the background, basically scan and create a list of items  you can configure for boot options:


8. Once StartUp-Manager is done polling the system for the information it needs, you can toggle the choices to your liking. In the sample below, I chose to shorten the Timeout to 5 from the original 10 seconds. I also chose to have Windows 7 as the Default Operating System. I'm not the only one using this PC, after all. And the wife prefers Windows 7 still. Everything else was pretty much left to the default values. After you're done, just click on the Close button:


9. StartUp-Manager will do the editing of boot options in the background:


10. Reboot and check to see if the options you set are to your liking. Just repeat the process of launching StartUp-Manager and clicking on different choices if you feel the need to change anything.

So much like everything Linux, there is a the terminal way of doing things and sooner-or-later an all-click, painless, graphical solution that some generous geek out there was kind enough to contribute to the community of users. Both methods are usually just as effective as the other. It's just nice to know that even in customizing your Linux install you are given choices. Choice matters for open-source and it's community of users are a great resource for giving every user in it that choice. Whether it be a way of doing things or different applications doing the same basic thing, there is choice. And that is where the crux of it all is!

What is Bit Rot?

Tuesday, June 14, 2011

0 comments
Imagine if you will a library filled with over a million books. In the inventory are a mix of old and new books. Now a majority of the books are read more often than others. Some only get read occasionally. Others still have sadly been forgotten and have reached a point where decay had already started or set in. Imagine as well that when some of these books are removed from the shelves they leave behind small bit and pieces or whole pages.

Stop PC Crashes with WinZip System UtilitiesWindows operating systems are like book libraries. In fact, they had what as Dynamic Link Libraries or DLL's. Whenever you click on something or open a program, these libraries are called to perform the sequence of activities to complete the task or function you want. Say, clicking on an icon on the desktop will start the program and the Windows operating system files that help that program do it's work. Now over time, if not properly maintained, neglected files will cause your computer to slow down. A few would be links to uninstalled programs, unused DLL files left over from uninstalled programs and duplicate files. Much like a real libraries, anthing unused just wastes precious space and makes it harder to find the books you really need. And just like real libraries, any left over material will eventually build up and cause further waste of space.

These broken and unused extra files eventually snowball and can cause everything from slow system performance to system lock ups. It's like the gunk building up on your drain, really. In computing, this is what's known as Bit Rot. So how do you prevent Bit Rot. You need to clean your DLL's and get rid of any unused files left over from installing, uninstalling, updating. You'll also need to clean up temporary files for stuff you won't need anymore. Fortunately, there are a lot of tools out there that can help. One tool that I use is CCleaner.

It has a Cleaner that will scan for and get rid of temporary files that are unnecessarily taking up space:


It's got a Registry Cleaner that automatically detects and cleans unused DLL's, files, shorcuts and help files:


It has tools to thoroughly uninstall programs, clean up startup items and securely wipe hard drives:


You can even run CCleaner to clear out your recycle bin automatically:


If that isnt enough for you, then maybe you need a swiss army knife kind of solution, a toolkit that will have it all in one small package. WinZip System Utilities might be the thing you're looking for.

Fix Registry Errors with WinZip System UtilitiesWinZip System Utilities has got Registry Optimizers that scans for and cleans registry errors, and organizes your registry for better faster performance. It's got Disk Cleaners & Optimizers that frees up disk space, defrags your hard disk and checks your hard drives for file system and disk errors. It's got a Memory Optimizer, a Driver Updater and a Game Optimizer to tweak your Windows settings to peak performance for the use you intend it for. It's got Security & Privacy Tools to help you clean hidden privacy-exposing traces, ermanently delete confidential data so that it cannot be retrieved. It's got a built in Encryptor to protect your personal files from unauthorized access. It's got Backup & Recovery Tools that allow you to recover accidently deleted data, automatically backup your important files and restore from saved backups. It even has a duplicate file remover. And to top it all off, all of what I just said can be scheduled to run regularly and automatically.

It's easy to use, it can do all the work for you when you want it to. I don't think there's a sweeter deal out there right now.  So go on over to WinZip's site and run a free scan to try it out.

Install Ubuntu 11.04 From a USB Stick

Wednesday, June 8, 2011

1 comments
Kingston Digital DataTraveler 101 Generation 2 - 16 GB Flash Drive DT101G2/16GBZETInstalling the CD image of Ubuntu onto a USB stcik is quite handy in certain situations. Say you need to install the latest and greatest version of Ubuntu in a Netbook. Or maybe you need to do emergency recovery and your optical drive chose the most inopportune moment to conk out on you. Or you may be like me, with shelves of burnt media and running out of storage. Whatever the case, you can try Ubuntu before you commit. It's just handy (and dandy, Joe) that you can do it from a USB stick. 
1. Download Ubuntu from http://www.ubuntu.com/download/ubuntu/download. Remember the location where you downloaded the .ISO file. Using the default location under My Documents works best, the installer will automatically scan those folders. 

2. Download PendriveLinux's Universal USB Installer from http://www.pendrivelinux.com/downloads/Universal-USB-Installer/Universal-USB-Installer.exe 

3. Launch the Universal USB Installer and agree with the terms:


4. Start configuring the Options:


5. Select the flavor of Linux you want to install using the drop-down menu on Step 1. For our case it's Ubuntu 11.04:


6. If the Universal USB Installer can't find the ISO automatically, specify the location by clicking the Browse button on Step 2. In the sample below, I downloaded it to Drive D:\ :


7. Choose the drive letter of your USB drive in Step 3. You can tick the option to format the drive before you install Ubuntu on it:


8. Click on the Create button to start installing:


9. Confirm your options by clicking on Yes on the next notification:


10. Grab a cup of joe while you let the installer do it's work:


11. You'll see another window where the status is tracked. Caution should be exercised, as this can be hypnotic for geeks like me:


12. And we are done!


Now, reboot your computer, go into BIOS and choose the options to boot into USB devices before the hard drive or optical drive. You can use the 'Live CD' in the USB stick to try out Ubuntu or choose to install it to your hard drive from there. Enjoy with a second cup of coffee!

Upgrade Itch - Zacate On My Mind (Part II)

Saturday, June 4, 2011

0 comments
Okay, after giving it some thought I've decided to come up with a more budget-friendly edition of my first proposal. I'm still going with Mini-ITX though, but this build won't cost as much as the first one. Let's get to it.

MI-008 Tower Black P4 Chassis with 250W Itx Psu+sata Power SupplyApex MI-008 ITX Case - Granted this case is bigger than the Antec ISK-100. And it does have a bigger internal power supply. In ITX terms 250 watts is overkill. But it does cost cheaper. The Apex MI-008 is two-thirds the cost of the ISK-100. When you consider that it can accommodate a desktop-sized internal hard drive and DVD drive, the savings increment up. With the added wiggle room, you can also add a PCI Express card. Well, assuming it's got a low enough passive heatsink. So going with the Apex MI-008 does add up the savings when you consider the bottom line.

ASRock E350M1 - Motherboard - mini ITX - AMD Fusion E-350 - AMD A50M - Gigabit Ethernet - onboard graphics - HD Audio (8-channel)Asrock E350M1/USB3Asrock has been around for a few years and is known to geeks as Asus' budget brand. If you want bang for the buck, Asrock is the way to go. You do have to wait around for Asus to introduce new features in its flagship brand before it trickles down to Asrock motherboards, but the wait isn't all that long. Give props to stiff competition. Features trickle down in 3-5 months after a mid to high-end board is released by Asus. So going back to the Asrock E350M1/USB3, it features the same trio of new tech I'm looking for in an upgrade: DDR3, SATA 6 GB/s and USB 3.0. It has solid capacitors, just like the Gigabyte GA-E350N-USB3.  It also features Xfast USB, a technology that's supposed to increase the speed of both USB 2.0 and 3.0. You can connect your displays using the onboard VGA, DVI and HDMI. An eSATA port is thrown in there for good measure as well. This is prime kit for the money, folks.

Kingston Technology HyperX Blu 4GB 1600MHz DDR3 Non-ECC CL9 DIMM (Kit of 2) XMP KHX1600C9D3B1K2/4GX4GB DDR3 Kingston HyperX - As with my first build, I am going with Kingston. This time around, I would have a little more to spend after choosing a cheaper Mini-ITX case. HyperX is Kingston's premium line. In  recent years, this line of premium products has expanded to meet every budget. So much so that they now have the Blu (entry-level), Genesis (mid), T1 (extreme enthusiast), LoVo (premium, low-voltage) and the H20 (extreme gaming). I'm picking the Blu with slim heat spreaders and better-than-average performance over most budget RAM. It goes perfectly with the small case.

Seagate Barracuda 2.0 TB 7200RPM SATA 6Gb/s 64MB Cache 3.5 Inch Internal Hard Drive for PC and Mac ST320005N1A1AS-RK - Retail Kit2 TB Seagate Barracuda XT - Seagate has been my preference for drives ever since I started building. I can only talk of my personal experience when  I say that I never had one fail on me. So I trust this brand more than the other brands I've tried. They weren't joking about the Hitachi 'Deathstar', let me tell you. I've had 2 Maxtors fail on me as well. I haven't tried WD yet, so I'll just say I'm keeping an open mind about them. For storage though, you really need to go with at least half of the largest available in the market. I filled up my current 500GB 7200.11 in just a little over a year. Yes, I know the reviews say the 7200.11 is a clunker that breaks down easily, but I've had one  for 2 years and it's still working. 500 GB is a bit constricted, especially if you are a data pack rat like me. I'm actually just barely getting by, deleting files by the folder when I reach a critical point. So yeah, if you plan on using your drive for a couple of years at least, you need a 2 TB drive.

LiteOn iHAS524 - Disk drive - DVD?RW (?R DL) / DVD-RAM - 24x/24x/12x - Serial ATA - internal - 5.25" - LabelTag24X LiteOn DVD Writer - It's LiteOn, it's cheap, it's fast and it's a brand I trust. I've said it once, I'll say it again. This is definitely a bang-for-the-buck drive for your basic burning needs. Plus, this particuar LiteOn model has Labeltag, a burning features that burns a label on the write side of the disk. Well, it does look like a gimmick, I admit. But I would prefer this over having Lightscribe because with Lightscribe you conditon can only use specific media that costs more than your usual blank DVD's. Lightsribed labels also fade in certain storage conditions, like using the wrong disc sleeves. With Labeltag, I can use my favorite Taiyo Yuden's without hesitation.
Free Ground Shipping on Orders $125 or more at EpsonStore
Stop PC Crashes with WinZip System Utilities

Copyright © 2011 Tech Throes | Splashy Free Blogger Templates with Background Images, Trucks