Check out Rommel Manzano's channel at Youtube: http://www.youtube.com/user/rommelmanzano?feature=watch
Unboxings & Choosing Your Next Smart Device - II
Thursday, April 18, 2013
0 comments
Now this is what I'm talking about when I say there is a lot of quality material out there from Pinoys into tech reviews. Just take a peek at these 2 videos on the features of the Cherry Mobile Omega HD. The content is just so compelling, I almost want to run out and buy one of these phones.
Check out Rommel Manzano's channel at Youtube: http://www.youtube.com/user/rommelmanzano?feature=watch
Check out Rommel Manzano's channel at Youtube: http://www.youtube.com/user/rommelmanzano?feature=watch


The MSI MK9132 Keyboard-Mouse Duo
Wednesday, April 17, 2013
0 comments

When I did my most recent build last year, I just so happened to purchase an MSI A75MA-P35 motherboard and installed it on an MSI Eagle slim-ATX case. A few days ago I bought an MSI keyboard+mouse combo I've been eyeing at CD-R King for months. I didn't really know if this was an actual product from Microstar, but heck the price won me over.
For the low-low price (which is what CD-R King is best known for) of 320 pesos, I got this set:

The keyboard is actually quite good. The keycaps are made of ABS plastic. It's supposedly spill-resistant. A quick inspection of the bottom confirms the presence of drain holes. Well, sorry but I won't be testing that for you though. It's also supposed to have laser-etched markings so the letters printed on it should last at least a few years. What surprised me was how quiet this thing is when you're typing. It is quite silent compared to my trusty old A4Tech KLS-5UP mini-keyboard.

The mouse on the other hand felt quite flimsy in comparison. The material for the right and left buttons felt so plasticky I was afraid I'd chip it if I pressed too hard. The wheel was noisy compared with how quiet the keyboard was...LOL. The sensor was spot-on though. No complaints there. I mean, this ain't gaming quality, but for simple everyday browsing, it works fine. I did put it back in the box though. I still preferred my A4Tech V-Track N-400.
I now have a complete system though. I won't be buying an MSI monitor any time soon, so scratch that. But I think having a set like I have now is quite satisfactory.
Samsung Mega - Phones Just Got Ginormous...Again!
Tuesday, April 16, 2013
0 comments
Samsung announced the Galaxy Mega last week in a press release. I've been waiting for videos of the product in actual consumer hands but they have been hard to come by. But here's a video that was apparently leaked, with commentary from the poster:
I haven't seen units yet in any local stores either. What is known for certain are the specs, as published in the press release. In a nutshell, the specs I find important are as follows:
This thing is huge compared to the Galaxy Note II's 5.3 inches. It is just ever so slightly smaller that a 7-inch tablet. Aside from the pudgy-fat-fingers use-case and the i-can't-type-properly-on-a-small-screen issue with users like me, this is not a phone for everyone. However, personal opinions aside, right now it's Samsung that is forging ahead of the competition in terms of creating new niches in the market. Creating products like the Samsung Mega explores the possibilities. If you check stores, both online and brick-and-mortar, other lesser known brands like Starmobile, Cherry Mobile, Cloudfone, MyPhone, etc. already have their own 5-inch or slightly smaller screened phones. That niche was non-existent if we were talking about screen sizes before the original Galaxy Note was launched.
With the positive response from the way the Galaxy Note II got sold out when it was launched, only time will tell if the consumer market will embrace an ever bigger phablet. This is a gamble that I think Samsung will win though. But ultimately it's going to be the consumer who decides whether this niche deserves it's own line of products.
I haven't seen units yet in any local stores either. What is known for certain are the specs, as published in the press release. In a nutshell, the specs I find important are as follows:
- Display: 6.3-inch HD TFT
- Processor: 1.7GHz Dual Core ARM Processor
- OS: Android 4.2 (Jelly Bean)
- Camera: 8 MP rear-facing camera, 1.9 MP front-facing camera
- Connectivity: Wi-Fi a/b/g/n/ac, WiFi Direct, BT 4.0, USB 2.0
- Memory: 8/16GB Internal Memory (microSD up to 64GB) + 1.5GB RAM
- Battery: 3,200 mAh Li-ion Standard Battery
This thing is huge compared to the Galaxy Note II's 5.3 inches. It is just ever so slightly smaller that a 7-inch tablet. Aside from the pudgy-fat-fingers use-case and the i-can't-type-properly-on-a-small-screen issue with users like me, this is not a phone for everyone. However, personal opinions aside, right now it's Samsung that is forging ahead of the competition in terms of creating new niches in the market. Creating products like the Samsung Mega explores the possibilities. If you check stores, both online and brick-and-mortar, other lesser known brands like Starmobile, Cherry Mobile, Cloudfone, MyPhone, etc. already have their own 5-inch or slightly smaller screened phones. That niche was non-existent if we were talking about screen sizes before the original Galaxy Note was launched.
With the positive response from the way the Galaxy Note II got sold out when it was launched, only time will tell if the consumer market will embrace an ever bigger phablet. This is a gamble that I think Samsung will win though. But ultimately it's going to be the consumer who decides whether this niche deserves it's own line of products.
Unboxings & Choosing Your Next Smart Device
Saturday, April 13, 2013
0 comments
With the increasingly overlapping release dates of so many competing smartphone brands, it's been hard to keep up with the latest device releases. It's become harder to maintain a good grasp of what products give the best value for money, especially if you're on the lookout for your next phone or tablet. So reviews, specifically unboxings with demos, like the one below are really useful for evaluating products you may want to consider buying. The one linked below is for the about to be released Starmobile Diamond:
Increasingly, I find myself watching the feeds for sites like Rappler.com. You should look for local reviews when looking for a product to buy. The important thing is to see the Filipino perspective about a device before looking at it. Like other Asians, we don't necessarily have the same use-case scenarios that North Americans have. It's better to look for local tech journalists reviewing locally released products, so you get to experience a review that is as relevant to you as possible.
Also look for product information on stores you can physically go to to try the thing. It's common for stores not to give you hands on time with device, so walk away if the retail store does that. You should 'vote' with your money. Buy from the stores that give you the chance to test the product before you actually buy it. Let them know you appreciate the tinker time they give you.
So what will your next smartphone be? Where did you first hear about it? Did you watch a detailed review of it before deciding to go to store to check it out?
Increasingly, I find myself watching the feeds for sites like Rappler.com. You should look for local reviews when looking for a product to buy. The important thing is to see the Filipino perspective about a device before looking at it. Like other Asians, we don't necessarily have the same use-case scenarios that North Americans have. It's better to look for local tech journalists reviewing locally released products, so you get to experience a review that is as relevant to you as possible.
Also look for product information on stores you can physically go to to try the thing. It's common for stores not to give you hands on time with device, so walk away if the retail store does that. You should 'vote' with your money. Buy from the stores that give you the chance to test the product before you actually buy it. Let them know you appreciate the tinker time they give you.
So what will your next smartphone be? Where did you first hear about it? Did you watch a detailed review of it before deciding to go to store to check it out?
Best Cans for Your Portable Audio
Wednesday, April 10, 2013
0 comments
Every music and podcast lover wants to take their music with them. Be it a boring commute to work, or the dreary atmosphere at the office, having your own audio to make the day bearable always helps gets you through. Here are in my opinion the best cans out there:

 Heil Sound Pro Set 3 - with high quality 40 mm Rare Earth Neodymium magnets and voice coils, a frequency response of 10 Hz - 22 kHz and the solid engineering of Bob Heil behind it all, what's not to love about it? Well, maybe the price. But then again, these cans are worthy of any studio and are frequently used by recording artists, pro podcasters and musicians. If you want to show everyone you've evolved into the pro, get these headsets. Available at Amazon and Heil Sound. Price: US$110.

 Audio-Technica ATH-M50WH Professional Studio Monitor - Nothing says cool like a white set of Audio Technica cans. And nothing is cooler than a bargain! You know me, I love bargains. This pair used to cost US$209. It's available now at Amazon for almost $90 dollars less! And these don't scrimp in quality either. With 45 mm large-aperture drivers with neodymium magnets, a closed-back cushioned ear cup design and an adjustable padded headband, you'll wear these all day long and enjoy that progressive rock playlist you've been keeping secret from friends. It even has a coiled cable and a collapsible design for easy portability and convenient storage. I would prefer these over any $200, celebrity-endorsed, big-letter-B-branded pair any day! Available at Amazon and Audio Technica. Price: US$121.


 Klipsch Image ONE Premium - Time for another bargain! Klipsch, another one of those less popular but reliable brands came out with this a few years back, but now is the time to snap a pair. This used to cost US$ 150. It can now be had for almost half that. With a 16 Hz - 23 kHz frequency response, 40mm dynamic moving coil speakers, professional grade memory foam ear-cups, these cans won't shortchange you even one bit for its current price. And it's perfect for your iPhone, with its iPhone-friendly mic & 3-button remote. For smartphones, this one is a nice compromise between portability and quality. Available at Amazon and Klipsch. Price: US$85 (for a limited time, Klipsch is offering Free Shipping ON ALL Orders At Klipsch.com! Click Here!).
Heil Sound Pro Set 3 - with high quality 40 mm Rare Earth Neodymium magnets and voice coils, a frequency response of 10 Hz - 22 kHz and the solid engineering of Bob Heil behind it all, what's not to love about it? Well, maybe the price. But then again, these cans are worthy of any studio and are frequently used by recording artists, pro podcasters and musicians. If you want to show everyone you've evolved into the pro, get these headsets. Available at Amazon and Heil Sound. Price: US$110.Audio-Technica ATH-M50WH Professional Studio Monitor - Nothing says cool like a white set of Audio Technica cans. And nothing is cooler than a bargain! You know me, I love bargains. This pair used to cost US$209. It's available now at Amazon for almost $90 dollars less! And these don't scrimp in quality either. With 45 mm large-aperture drivers with neodymium magnets, a closed-back cushioned ear cup design and an adjustable padded headband, you'll wear these all day long and enjoy that progressive rock playlist you've been keeping secret from friends. It even has a coiled cable and a collapsible design for easy portability and convenient storage. I would prefer these over any $200, celebrity-endorsed, big-letter-B-branded pair any day! Available at Amazon and Audio Technica. Price: US$121.
Klipsch Image ONE Premium - Time for another bargain! Klipsch, another one of those less popular but reliable brands came out with this a few years back, but now is the time to snap a pair. This used to cost US$ 150. It can now be had for almost half that. With a 16 Hz - 23 kHz frequency response, 40mm dynamic moving coil speakers, professional grade memory foam ear-cups, these cans won't shortchange you even one bit for its current price. And it's perfect for your iPhone, with its iPhone-friendly mic & 3-button remote. For smartphones, this one is a nice compromise between portability and quality. Available at Amazon and Klipsch. Price: US$85 (for a limited time, Klipsch is offering Free Shipping ON ALL Orders At Klipsch.com! Click Here!).
Install Linux & Boot Tools on a Multiboot USB Drive
Tuesday, November 8, 2011
0 comments
 Okay, so you want to try the latest Linux distributions and you don't want them installed for some reason. Or you want to just do some test driving before you commit to a full install. Or maybe you're the sort of guy that helps family and friends with their computers and you're fond of using Linux tools to get the job done. Well, it would be handy if you had all your software tools in one small handy package. Think of the swissarmy knife a s good analogy. It may now have the best tools, but since it's pocket-able and has several different small tools, it comes in very handy in many situations.
Well, there's an easy way to create a multiple boot USB thumbdrive to enable you to boot of different tools without having to burn each one on to a CD. It's called Xboot [https://sites.google.com/site/shamurxboot/home]. It's just like UNetBootin which I wrote about on another post [http://techthroes.blogspot.com/2011/08/install-linux-onto-usb-stick.html]. What makes Xboot a little better is that it can configure you're USB drive with a bootloader enabling you to install more than just one operating system. You also have the option to install non-Linux bootable tools like Ultimate Boot CD or Hiren's Boot CD.
Here's how to install you're favorite tools onto a USB drive with Xboot:
First, download the tool from https://sites.google.com/site/shamurxboot/download:

After you download it, you need to extract the zipped file to a location on your computer where it'll be easy to find. The Desktop usually works best. You'll always know how to get there and it'll make it a cinch to find. Click on the extracted xbootvs1.0beta14.exe file and you should see this window:

Next, from the main window (as it appears above) drag your Linux ISO images onto the open space with columns labeled Name, Size, CAtegory, etc. It's really that simple. Just click on the files from your file browser and drag 'em there. Now in some cases the ISO you choose can't be identified by Xboot. You'll need to tell it what kind of image it is. Is it a Linux image, like Ubuntu, Fedora, or OpenSuse? Or is it one of those self-booting rescue tools like DBAN or Ultimate Boot CD:

It's good though that there are a lot of presets and Xboot will try to configure the install for the particular bootable tool or OS using the option you choose. Be cautious though, since if you make the wrong choice the whole USB will not boot at all. Here's a preview of those options:

Now, once you've had your starting line up figured out, have Xboot create the Multiboot USB for you. Just click on the Create USB button:

After that you'll be asked to pick which drive you'd want to install everything in. You can also select you choice of bootloader from the same dialog, but I'd go with Syslinux:

So after you're done with all the options, let Xboot do it's thang...

 Now it will take some time for Xboot to set everything up, so this would be the perfect for you to get a Coke from the Vendo or a cup of coffee from the pot. If you've known me for some time, you would know. I'm a coffee kind of guy. So I'd get a cup if you were me. But, you know. To each his own. It may take around 15-20 minutes to get everything setup, so take your sweet time and don't worry about it. Okay, okay. I know... I'm stalling. Next step is to test the thing's working.
To test if the installed OS and tools are booting, you can go back to Xboot. Click on the QEMU tab, pick the drive you installed to and click boot :

I never did get that to work for some reason. So YMMV (your mileage may vary) ... I did however, reboot my machine and and let it boot from the USB and tadaaa:

I tested all of the stuff I installed and when was sure everything was working I got back to my cup of joe. I thought to myself, it's nice to have a multi-tool like this in your pack of geek gear. You can have this too. Have fun experimenting with Xboot while you're at it :-)
The Latest & Cheapest - AMD Llano Build With $ to Spare
Wednesday, October 12, 2011
0 comments
I've always been an advocate of the new technologies, but I've always had to spend within reason. The latest and greatest isn't practical. When you've got responsibilities, there are some things that need more priority when it comes to money. Anyway, I don't feel too left out. I do what I got to do and still have the latest technology. If I choose my parts right, I can definitely have a computer that's not a sluggard even after 2 years of use.
So here's my choice for my Latest & Cheapest build:

 AMD Llano A4 3400, 2.7 GHz- the latest iteration of AMD techniologies focuses on creating a product with a lot of value. AMD's Llano is it's APU, an Advanced Processing Unit, it's nickname for a CPU+GPU combo on the same physical package. The A4 may be the cheapest of it's siblings, but it isn't the slowest processor out there. It's got 2 cores pumping out 1.9 GHz all while sipping power with it's TDP of 35 Watts. Price: PhP 3,290 (Cash Promo) at PC Hub.
 Emaxx A75GM iCafe- Emaxx has been producing low-priced motherboards for around 5 or 6 years now. Teir iCafe series has always been the cheapest of the lot, focusing on just the basics and a price that makes it irrestible to small business owners (re: internet cafe owners) Price: PhP 3,110 (Cash Promo) at PC Hub.
 Inwin EC036 ATX w/ 350W PSU- Low-priced ATX case bundled with a 350W PSU that should be plenty if you choose the right parts. It looks good too. 'Nuff said. Price: PhP 1,590 (Cash Promo) at PC Hub.

 G.Skill Value Ram 4GB DDR3 1333- I know a bargain when I see one. GSkill has always enjoyed a good rep with geeks for its performance. It don't matter that this is the Value RAM. GSkill is still GSkill. Price: PhP 1,150 (cash Promo) at PC Hub.

 1TB Seagate 7200.12 (32mb cache) SATA HDD- I keep harping on how good Seagate is. Well, I'll harp on it some more. They are reliable. And one more thing, 1TB should be more than enough room to store that ",movie collection" of yours ;-) Price: PhP 2,790 (Cash Promo) at PC Hub.
LiteOn iHAS524- Another brand that I've trusted and relied on for many years, these guys have been OEMing for Dell and Sony for the longest time. It's time they get some press, even if it's from a small-traffic blogger like me :) Price: PhP 830 at Enigma.

The final price? PhP 12,760 or around US$ 295. It's cheap and the tech is new. I couldn't ask for more for the money.
So here's my choice for my Latest & Cheapest build:
AMD Llano A4 3400, 2.7 GHz- the latest iteration of AMD techniologies focuses on creating a product with a lot of value. AMD's Llano is it's APU, an Advanced Processing Unit, it's nickname for a CPU+GPU combo on the same physical package. The A4 may be the cheapest of it's siblings, but it isn't the slowest processor out there. It's got 2 cores pumping out 1.9 GHz all while sipping power with it's TDP of 35 Watts. Price: PhP 3,290 (Cash Promo) at PC Hub.Emaxx A75GM iCafe- Emaxx has been producing low-priced motherboards for around 5 or 6 years now. Teir iCafe series has always been the cheapest of the lot, focusing on just the basics and a price that makes it irrestible to small business owners (re: internet cafe owners) Price: PhP 3,110 (Cash Promo) at PC Hub.
Inwin EC036 ATX w/ 350W PSU- Low-priced ATX case bundled with a 350W PSU that should be plenty if you choose the right parts. It looks good too. 'Nuff said. Price: PhP 1,590 (Cash Promo) at PC Hub.
G.Skill Value Ram 4GB DDR3 1333- I know a bargain when I see one. GSkill has always enjoyed a good rep with geeks for its performance. It don't matter that this is the Value RAM. GSkill is still GSkill. Price: PhP 1,150 (cash Promo) at PC Hub.
1TB Seagate 7200.12 (32mb cache) SATA HDD- I keep harping on how good Seagate is. Well, I'll harp on it some more. They are reliable. And one more thing, 1TB should be more than enough room to store that ",movie collection" of yours ;-) Price: PhP 2,790 (Cash Promo) at PC Hub.LiteOn iHAS524- Another brand that I've trusted and relied on for many years, these guys have been OEMing for Dell and Sony for the longest time. It's time they get some press, even if it's from a small-traffic blogger like me :) Price: PhP 830 at Enigma.
The final price? PhP 12,760 or around US$ 295. It's cheap and the tech is new. I couldn't ask for more for the money.
Install Linux Onto a USB Stick
Thursday, August 11, 2011
0 comments Okay, so I wrote about using the Universal USB Installer to create a bootable virtual CD-ROM on your USB thumb drives. That was a few weeks back, but I've been busy with a lot of other things so pardon the delay. If you want to go back, I wrote about it here: Install Ubuntu 11.04 From a USB Stick. So you might ask, "Why would I use this?" I covered some of the reasons in my earlier post. Another reason I do this is I usually get asked to help out friends and relatives with their computers. I used to bring along this small zip up sling bag that was a CD wallet inside. I have all my rescue CD's in there. I also have a precision screw driver set in there. That's all I need to be a one-man geek rescue squad. Well now that USB sticks have increased in capacity and tools have been made available online, it's now possible to chuck those CD rescue disks and use USB thumb drives instead.
Well after posting that, I felt it was a bit unfair if I didn't post about how to do this over on the Linux end with UNetBootin. And yes, it is as easy as downloading the application, choosing settings and rebooting your computer. Let's get to it.
1. If you're comfy with using commands on the terminal, just open one up and type in sudo apt-get install unetbootin. You'll be asked for your password, as always:

2. You can also launch the Synaptic Package Manager (available in many Linux distributions) and download it from there. Just fire up Synaptic, click Reload and once everything's updated use Search to find UNetBootin. Tick the check box and click Apply:

3. After installing it whichever way you want, launch UNetBootin :

4. You can have UNetBootin download the ISO image of the Linux distribution you want by choosing the Distribution and use the drop-down menus to choose your flavor of Linux and version of choice:

5. If you already downloaded the ISO of your Linux of choice, just click on the Diskimage option and tell UNetBootin where it is on your computer. :
 |
| By the way, I would recommend connecting one USB thumbdrive so it doesn't get confusing when you choose the device to install everything on. If you're all good with that, click on the OK button. |
6. This here is my favorite part. I let the app do it's thing automagically and I get to get up and grab a cup of coffee:

7. Once the install is complete, just click on the Reboot button:

When the computer reboots, go into BIOS and change the settings to make the USB stick the first thing it will boot to. On certain computers, you have function keys (F1 to F12) that you can use it brings up your booting options. This is different from computer to computer, even from motherboard to motherboard. So consult your handy user manual.


 So now that I have a bootable Linux rescue CD installed on my USB thumb drive, I can ditch the real CD's. And I can ditch the sling bag too. I still need to bring along my screwdrivers though. But what if I have several rescue CD's I need? Well, I'll cover installing multiple live CD's onto a single USB stick on another post. Yes! Multi-boot is possible on USB sticks too with the right tools. Stay tuned in for that one.
Edit Grub2 Boot Options Easily on Ubuntu 11.04
Friday, June 17, 2011
2 comments A few months back I shared my discovery about editing boot options in Grub2 and how there was a different way to edit the boot options on menu.lst safely. I blogged about that in this post: Missing Your menu.lst? You've Got Grub2!
Having re-installed Ubuntu recently, I wanted to document how to do it within a GUI environment with mouse-click ease. Well, not really. I mean, you do have to type in a few things to actually download the app you need to do the boot options editing for you. But, it is easy and it is inside the picture-pretty interface. No terminal commands are involved and there were no animals harmed during the making of this HowTo. So enough of the dry wit and let's get to it:
1. First, you need to download StartUp-Manager. The easiest way to do that is through the Ubuntu Software Center. You can click on the icon on the sidebar in Ubuntu 11.04:
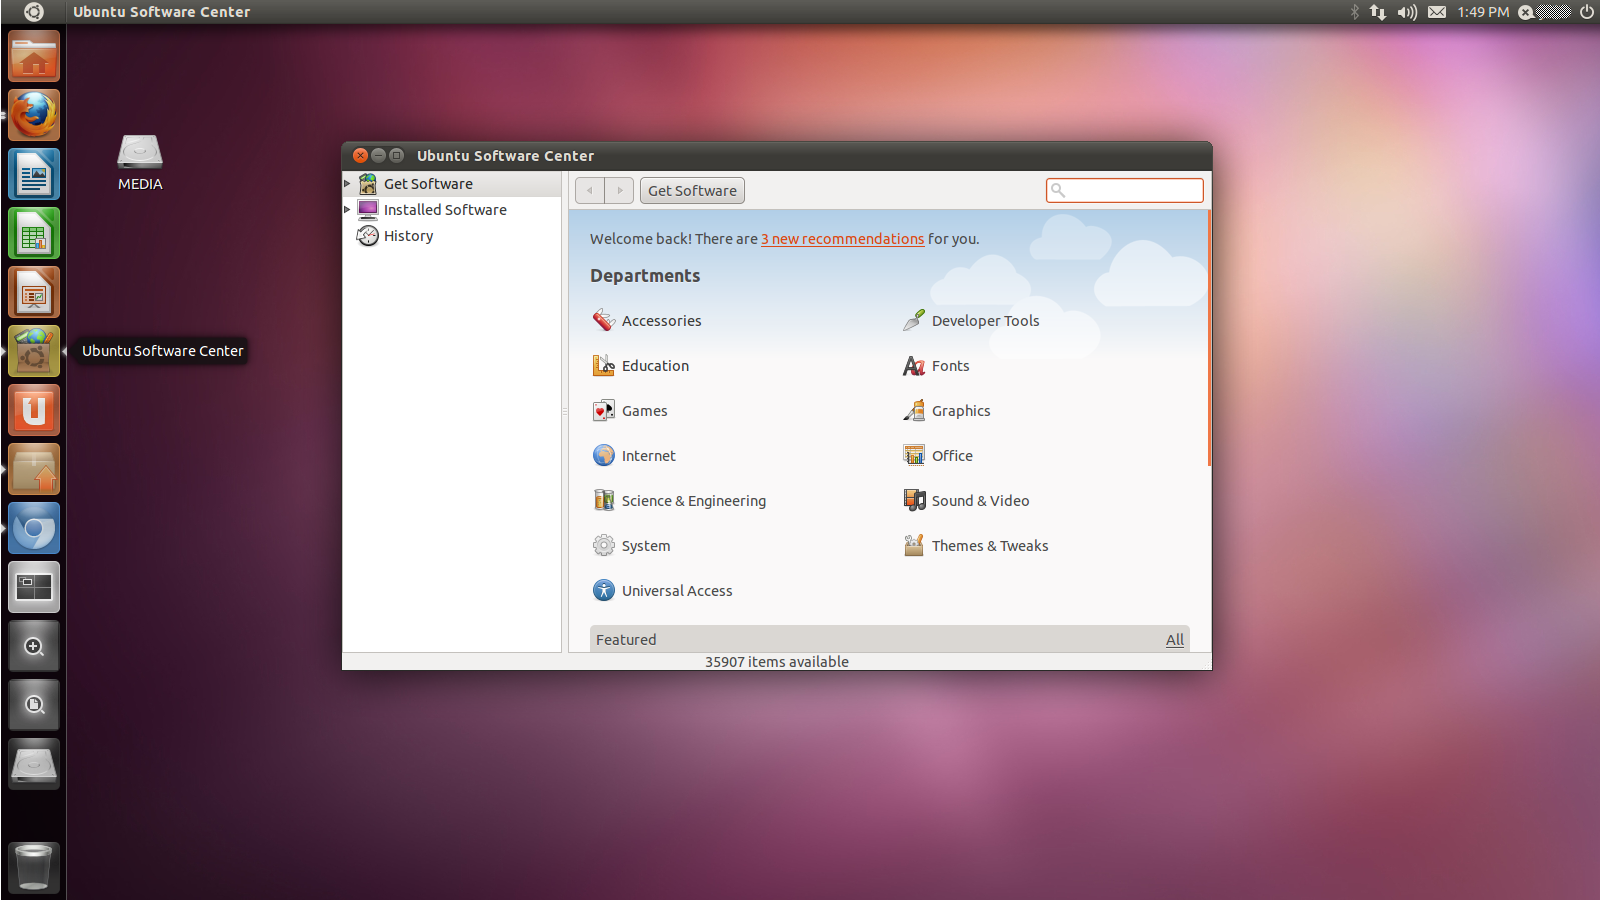
2. Next, use the Search box in the Ubuntu Software Center to find the software you need. You can simply type in "StartUp" and Search will give you choices. StartUp-Manager is usually the first one:

3. Click on the entry for StartUp-Manager to select it. Once you click on the Install button, you'll be asked for your password:

4. Key in your password to authorize the install:

5. You'll be able to check on the progress of the download while it is running:

6. After it is installed, where do you find it? Unlike previous versions on Ubuntu, where clicking on the Ubuntu logo will bring up a list of applications, 11.04 brings up a Search box instead of a huge list. I'm not a fan of it, but this may be easier for some people. Type in "Start" or "Startup" in Search and you should see StartUp-Manager listed first. Click on the icon to launch:

7. StartUp-Manager will perform a few tasks in the background, basically scan and create a list of items you can configure for boot options:

8. Once StartUp-Manager is done polling the system for the information it needs, you can toggle the choices to your liking. In the sample below, I chose to shorten the Timeout to 5 from the original 10 seconds. I also chose to have Windows 7 as the Default Operating System. I'm not the only one using this PC, after all. And the wife prefers Windows 7 still. Everything else was pretty much left to the default values. After you're done, just click on the Close button:

9. StartUp-Manager will do the editing of boot options in the background:

10. Reboot and check to see if the options you set are to your liking. Just repeat the process of launching StartUp-Manager and clicking on different choices if you feel the need to change anything.
 So much like everything Linux, there is a the terminal way of doing things and sooner-or-later an all-click, painless, graphical solution that some generous geek out there was kind enough to contribute to the community of users. Both methods are usually just as effective as the other. It's just nice to know that even in customizing your Linux install you are given choices. Choice matters for open-source and it's community of users are a great resource for giving every user in it that choice. Whether it be a way of doing things or different applications doing the same basic thing, there is choice. And that is where the crux of it all is!
Subscribe to:
Posts (Atom)


 Posts
Posts


