Update Your Facebook Status With Twitter

Monday, December 7, 2009

0 comments
The other day I was asked by a friend how I update my Facebook status even if I'm offline. I just said I updated through my mobile. Well, that's half true. I actually set it up so my Facebook status is updated with every tweet I post. I have been using Twitter a lot longer than Facebook and it seemed logical that I should use Twitter status updates to likewise update my Facebook status. Good thing about it is I can update my Twitter status by sending a text message to @tweetitow (more on that in this blog post: Send Twitter Updates Thru SMS).

Here's how I set up Facebook to update with my Twitter updates...

1. Login to Facebook and use Search get to the Twitter application page. It's best to just use Search within Facebook, the URL changes from user to user so I won't link to it directly:

2. Once there, click on Go to Application:


3. Authorize the app by clicking the Allow button:


4. Key-in your Twitter details:

5. After that you'll be redirected to your personal page where you could tweet from within Facebook. Click on the Allow Twitter to Update Your Facebook Status button:

And you are all set. All your tweets will appear in your Facebook as status updates. Happy tweeting!

Send Twitter Updates Thru SMS

Sunday, December 6, 2009

2 comments
Updating Twitter using my mobile used to be expensive. Since I am in the Philippines, I was limited to sending international SMS to Twitter's UK number. But then I discovered phTwitters. Then it stopped working. It was free after all and nobody was required to pay anything for it. I'm not really sure if they stopped because they didn't have enough resources to sustain operations. No matter, though. I found @tweetitow.

With @tweetitow, I simply send a text message to their number and it gets posted on my Twitter page. The major plus to using it is it's free, aside that is from the cost of sending a regular text message that is.

Here's how to sign up and use it:

1. Register by sending an SMS to any of the following numbers (really useful if you have unlimited texting, there's a number for each carrier):
  • Globe: 0927-338-9183
  • Smart: 0928-102-0579
  • Sun: 0923-986-0673
2. Use the following format (without the quotes): 'REG username password'
3. You'll get a text confirmation from a different number.
4. Reply to that number to have your status updated.

There, you should be all set then. Be sure to drop by this Tweetitow's FAQ's to make the most out of service. If you're new to Twitter, drop by the Twitter Help page to learn more about how it works.

If you enjoy the convenience of using @tweetitow, please consider donating load to them to keep operations running. They don't charge anything so they need help maintaining the costs for cellphone numbers used in the service. As much as possible, please send call cards instead of e-load or autoload. They will be able to use call card load a lot longer than the electronic kind that expires in a matter of days. Just send a Direct Message to @tweetitow for details on how you can send your valuable donations to keep the Filipino tweeters tweeting from their mobiles :-)

Happy tweeting!

Pinoy Artists Sing for Awareness on Climate Change

Wednesday, December 2, 2009

0 comments
Just wanted to share this video.I know that I don't have that many readers but anyone who reads this and watches the video will be one more aware individual. Let's talk about this, act on it, spread the word:


HowTo - Install Drivers From The Dell Resource CD

Wednesday, October 28, 2009

2 comments
You may be wondering why I'm posting this. I was asked by a friend about installing stuff from discs that came with his system. I thought this kind of thing may be useful to some other people as well. I mean, not everyone is as savvy with this stuff. The following is not a comprehensive guide, just something to get you started and give you an idea of what to click and what for.

That said, time for a little rant. I hate what I call the 'yes-click' syndrome -- agreeing to everything the software says it will do by blindly clicking 'agree' and 'yes' without reading the fine print. That's plain asking for trouble, because that is exactly what a trojan, adware or malware will want you to do. Legit programs can also install 'extra' stuff that may slow your system down. Bottomline, read the fine print or any message before clicking 'agree' or 'yes'.

Now back to the guide.

The screenshots are from XP. I would have gotten them from Vista or Windows 7 had I had a system that came with it. Unfortunately, I only had an old Dell laptop to test this with. I used an equally old Dell Resource CD. The screens may look different in newer versions but the basics are the same. Here we go:

  • Pop in the CD in the CD or DVD drive. If it doesn't start by itself, double-click on My Computer or use a nifty keyboard shortcut by pressing the Windows Key and the letter E at the same time. The Dell Resource CD would have a name like RESOURCE_CD. Double-click RESOURCE_CD :

  • If Autorun is disabled (which I should add is the safest option), double-click on the file AUTORCD.exe or AUTORCD to launch the Dell Resource CD installer:

  • That should start the installer right away. Read the message and click OK if you agree:

  • The Dell Resource CD will then be 'installed'. In reality, I will be installing links to the actual files on the CD, and pleace those links in your Start Menu options. Here it is prepping the installer:

  • Read the message and click Next if you want to continue:

  • There's no stopping us now. Read the message and click Install if you want to continue:

  • And off it goes:

  • Click on Finish so you can start installing drivers:

  • Once installed, you'll get the following dialog to help you get started:

  • Click on Next in the dialog above will bring you to the main page of the Resource CD, where you'll find link to common tasks in the CD. If you check below you'll see links for Utilities, Drivers, Diagnostic Utility and Applications (click on the graphic for a larger pic):

  • Choosing Drivers from the page above will bring you to the main drivers page shown below. You'll notice some drivers already have check marks beside them. That means they've already been installed:

  • Clicking on any link in the above screen will direct you to another page where specifics of the driver are listed. Clicking in the Extract button will launch the driver installer for this driver (sample below is for the Audio Driver):

  • The succeeding screens show the driver install process. In most cases, the default choices will do fine. The first will tell you what you're installing and what it is for:

  • Next it will ask where to unpack the drivers. You can change the folder if you wish, but the default will do fine:

  • Then it will ask if you want to allow a new folder to be created for the driver:

  • Next is a confirmation that the files were unpacked into the chosen folder:

  • As in the earlier part where the Dell Resource CD was installed, the InstallShield takes over and installs the necessary files, but not until you click Next:

  • And off it goes to copy files and configure settings:

  • Once finished, the next screen will ask what to do next. If your done installing drivers, choose Yes then click the Finish button to restart the computer and have the changes set. If you have any other drivers you wish to install, choose No then click the Finish button:

  • You can continue installing other drivers by going back to the Driver page of the Resource CD:

Now, any time you wish to use the Resource CD, just pop it in the drive and let it run :-)

The World Needs You!

Saturday, October 24, 2009

1 comments
Helping curb climate change can be a daunting task. The contribution of one person may seem an insignificant, but not if we come together to commit to making things change.


To know more, follow 350.0rg in Twitter or become a fan in Facebook

Climate Change -Ways Geeks Can Help

Friday, October 16, 2009

0 comments
  • Reuse old computers, don't throw them away. Linux can bring that old machine back to life.
  • Use electronic devices for the longest possible time. Buying the latest and greatest cellphone every year isn't helping the environment Disposed cellphones will just add to landfills near you and pollute the ground with toxins. Make them last.
  • Pick your electronics wisely, use gadgets, gear and computer parts that have low power consumption. Low power consumption means less heat. And less heat means less cooling. You save twice on electricity consumed if it's low-power and takes less energy to cool.
  • Turn off that computer! It's no longer practical to keep a computer running 24-7 just to keep the components hot and save them from damage.
  • Go CFL! Compact Flourescent Lighting. One of the biggest energy savings we've made at home was because we've switched all our lights to CFL Using a 5-9 watt CFL is just as bright as a 20-40 watt ordinary bulb. It may not look like much but multiply that 10 -30 watt different by the number of lights in you house and the number of hours you usually have them on. Do the math, you can save a bunch.

These are just a few ideas, I hope I get you thinking about what you can do on your own to do your part to conserve resources. And it's late, need to turn this off now.

Kindle - Now International!

Tuesday, October 13, 2009

0 comments
Just read this a few minutes ago. The Kindle can now be shipped, with the wireless subscriptions, internationally. I checked the link that had the country-specific information and the Philippines is one of the first 100 countries it can be sent to. I can have a Kindle and use it here!


I've been wondering about getting one since the first gen came out but I never thought they'd be bringing it to the Philippines this soon! This is another great geek gift. If you have a geek in the family and you're looking for a perfect gift for the Holidays, get your geek a Kindle.

And by the way, that makes me wonder whose 3G network they are on? Smart or Globe?

Ever Wonder What Happens in TechSupport?

Thursday, October 8, 2009

0 comments
Here's a funny look at tech support, how things are supposedly done behind the scenes - LOL. For people working tech support, please don't take this offensively. It's just a comic after all.


For more funny and geeky comics, go to http://xkcd.com/

What's New in 2009.06?

Wednesday, September 23, 2009

0 comments


Hmmm... With a title like Distinguished Engineer, teh geek has bragging rights!

ZFS Vid -

Saturday, May 16, 2009

0 comments

Found this while looking online for stuff about Open Solaris. I'm actually eager to try tyhe next version coming out in about 2 months. The ZFS concept interests me. If this thing is as good as they say it is, then it should become the journaled file system of the future. Open Source FTW!

HowTo: Update Facebook Status via SMS (cheap) - II

Wednesday, May 13, 2009

2 comments
Someone tipped me off that Globe also has an app on Facebok similar to PixMe! for updating FB content. It's called UPD8. Here's how to sign up and start using it.

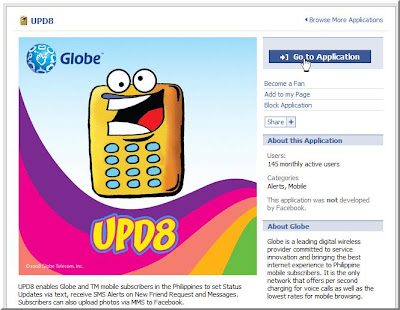
1. While logged on to your FB account, do a search for UPD8. When you get to to this page, click on Go To Application to start setting it up:

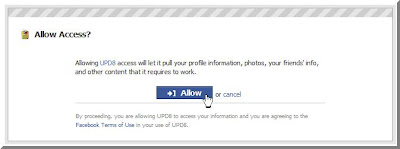
2. Click on Allow to grant the application access tyo your FB information:


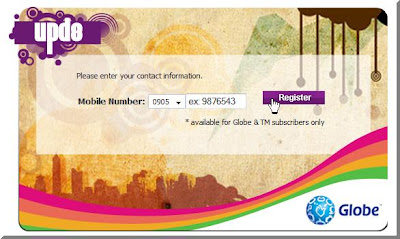
3. UPD8 will ask you ro register a specific Globe mobile number. Key in your number and click Register:

4. Confirm the registration by clicking on OK in the window that pops up:
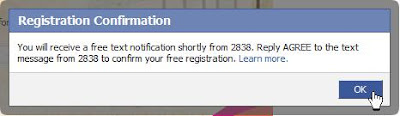
5. You'll receive a confirmation text message from 2838 that says, "Welcome to UPD8! To confirm registration, reply AGREE for free." Simply reply to that message with the word "AGREE".

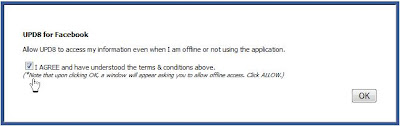
6. After you reply with the word "AGREE" to 2838, you'll get a confirmation text on your mobile and a confirmation message inside of FB. Click on the agree check box and hit the OK button:
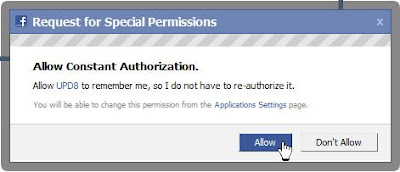
7. Another permission window will appear. Just click Allow to give FB permission to use the app:


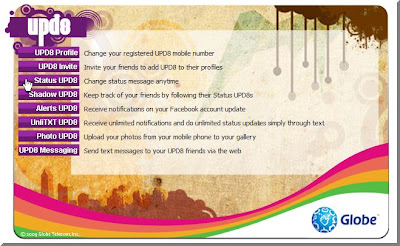
8. After that you'll be directed to the main UPD8 app menus and they look like this:


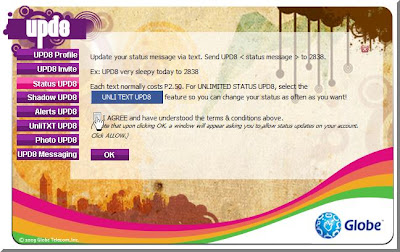
9. Since you're new and signing up, if you click on Status Updates it will show an agreement. You will have to click on the Agree check box to accept to the 2.50 per update charge. This will allow you to use the service. After that click on OK:

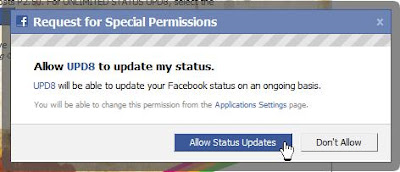
10. Another permissions window appears to allow the app to do status updates for you (just hit okay in the succeeding window):

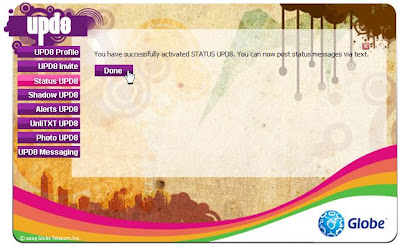
11. A confirmation that the process has been complete will appear in the main UPD8 page:


Now all you need to do is to send a message to 2838 using the syntax UPD8 *status*. Each update will cost you 2.50, although heavy users can go unlimited for 15 pesos a day. You can activate that by sending UNLI15 to 2838. If you're really, really must update it everyday and you update your status every hour, I'd recommend going unlimited for 5 days. That'll cost you 50 pesos, though if you push a lot of update it'd be worth it. Send UNLI50 to 2838 to get unlimited FB status updates for 5 days.

I must say that UPD8 has more features than PixMe does. I'm anxious to try all of them out, but that'll have to wait until i can get a proper phone for my second SIM.

HowTo: Update Facebook Status via SMS (cheap)

Saturday, May 9, 2009

1 comments
If you're a Facebook user and you'd like to update your status from your mobile, the usual way to go about it would be to confirm your number with Facebook and send pics and updates through MMS. Now if you're an avid FB user and you're in the Philippines the cost would snowball in a matter of days. I found a way to send updates and pictures to Facebook for 1 peso per update, though you'd have to be a Smart subscriber to do this. You can use a Facebook app called PixMe! Here's a quick guide on how to start using it:

1. Log in to your FB account, search for PixMe! then from this page click Go to the Application:

2. Click on Register in this screen to start the validation process:

3. You'll be asked to enter your Smart mobile number. Key in your phone number and click Register:


3. A window will pop-up to ask for permission. Click on Allow to authorize the PixMe app (click OK on the succeeding window that pops up):

4. You'll receive an SMS with this message:"Facebook notification msg: To validate ur cellnumber, txt FBVAL 123abc to 2330. If u r not XXnameXX, ignore this msg. This msg is free", where 123abc is the validation code and XXnameXX is your FB username.

5. Send a reply, following the syntax and the validation code in the message.

6. You will receive a confirmation message that the validation was successful.

7. Go back to the last PixMe! page you landed on after step 3 and click on the link to allow status updates:

8. You'll be asked to give permission again (click OK on the succeeding window):

9. You can now update your FB status by sending a messages to 2330. Use this command: FBSTATUS XXmessageXX (where XXmessageXX is the text of the status update you want to send). Each message is charged P1.00 .

There you have it. Enjoy updating your FB on the go.


UPDATE: Uploaded bigger versions of the screenshots to make them easier to recognize. Hope it helps

Making The Most Out of My Aging PC

Sunday, February 8, 2009

0 comments
It's been a while since I last blogged. I haven't been getting enough time to do so. Mostly I update Twitter, but that's because I can easily access it through SMS. It's really trivial to just jot down an update, especially so when your limited to 140 characters.

Anyway, I was looking forward to an upgrade but I had to use the money for car repairs. So I just decided to extend the functionality of my current PC, until I save up what I need. I have an old XPS T500, just to give you an idea what I meant when I said "aging PC".

Since most of the things I do need updated hardware, I prudently bought what could improve its functionality, considering this is a 10-year old machine. Here's my very short list:
Let's get into what I needed and why the above hardware. The LAN card on this 'Kublai' machine died around 2 weeks ago. No amount of coaxing could resurrect it. Hence the need for a LAN card. I settled on the D-Link as I have been using their products for years and I have had a great experience overall.

The USB ports on this machine hail back to the early days. It only has two USB 1.0 ports. Painfully slow, I knew I needed a boost eventually, I just had to find good enough reason. Enter the great season of Christmas and I got a hand-me-down iPod Video (Thank you, Auntie!!!). So now, I felt the pangs of having a slow USB connection hampering my transfer speeds. I got the PCI USB card primarily to speed up syncing the iPod. Second benefit is I could connect more devices on the same hi-speed interface now. I solved the dilemma of having to remove my USB Bluetooth Dongle when I need to connect another device. It was kind of odd though that the PCI card had 4 ports at the back and 1 additional port located on the side of the card. I found a use for the internal port. I connected the Bluetooth dongle and it's now inside the case :-) I also bought a recently-made card reader so I could transfer files to my wife's phone (the mini-card uses an MS Pro Duo adapter). It's always connected to the machine now.

As for the PCI SATA controlller card, I needed to buy a hard drive for extra storage. IDE HDD's are now becoming rare. Most HDD's are now SATA. Add to that the fact that my machine will choke on anything bigger that 120 GB's. The PCI Card allows me to use a bigger SATA Drive. The catch is that it would be difficult to install XP on it since it I would need to slipstream the SATA/RAID drivers into the installer before XP detects it. That doesn't matter to me right now. I have a working 80GB IDE HDD where I have the OS installed. What matters is the ability to use SATA to allow me the flexibility to use bigger drives and use current hardware on my aging machine. Heck the card even has an external port for connecting SATA devices. This card is what we call "sulit" in Filipino. My next buy would probably be a SATA DVD Writer ;-) How's that for an old machine?

I did buy a few other things from CDR-King, mostly for the iPod. But that's another blog post :-)
Free Ground Shipping on Orders $125 or more at EpsonStore
Stop PC Crashes with WinZip System Utilities

Copyright © 2011 Tech Throes | Splashy Free Blogger Templates with Background Images, Trucks