Showing posts with label Ubuntu. Show all posts

Install Linux & Boot Tools on a Multiboot USB Drive

Tuesday, November 8, 2011

0 comments
Okay, so you want to try the latest Linux distributions and you don't want them installed for some reason. Or you want to just do some test driving before you commit to a full install. Or maybe you're the sort of guy that helps  family and friends with their computers and you're fond of using Linux tools to get the job done. Well, it would be handy if you had all your software tools in one small handy package. Think of the swissarmy knife a s good analogy. It may now have the best tools, but since it's pocket-able and has several different small tools, it comes in very handy in many situations.

Well, there's an easy way to create a multiple boot USB thumbdrive to enable you to boot of different tools without having to burn each one on to a CD. It's called Xboot [https://sites.google.com/site/shamurxboot/home]. It's just like UNetBootin which I wrote about on another post [http://techthroes.blogspot.com/2011/08/install-linux-onto-usb-stick.html]. What makes Xboot a little better is that it can configure you're USB drive with a bootloader enabling you to install more than just one operating system. You also have the option to install non-Linux bootable tools like  Ultimate Boot CD or Hiren's Boot CD.

Here's how to install you're favorite tools onto a USB drive with Xboot:

First, download the tool from https://sites.google.com/site/shamurxboot/download:


After you download it, you need to extract the zipped file to a location on your computer where it'll be easy to find. The Desktop usually works best. You'll always know how to get there and it'll make it a cinch to find. Click on the extracted xbootvs1.0beta14.exe file and you should see this window:


Next, from the main window (as it appears above) drag your Linux ISO images onto the open space with columns labeled Name, Size, CAtegory, etc. It's really that simple. Just click on the files from your  file browser and drag 'em there. Now in some cases the ISO you choose can't be identified by Xboot. You'll need to tell it what kind of image it is. Is it a Linux image, like Ubuntu, Fedora, or OpenSuse? Or is it one of those self-booting rescue tools like DBAN or Ultimate Boot CD:


It's good though that there are a lot of presets and Xboot will try to configure the install for the particular bootable tool or OS using the option you choose. Be cautious though, since if you make the wrong choice the whole USB will not boot at all. Here's a preview of those options:


Now, once you've had your starting line up figured out, have Xboot create the Multiboot USB for you. Just click on the Create USB button:


After that you'll be asked to pick which drive you'd want to install everything in. You can also select you choice of bootloader from the same dialog, but I'd go with Syslinux:


So after you're done with all the options, let Xboot do it's thang...


Now it will take some time for Xboot to set everything up, so this would be the perfect for you to get a Coke from the Vendo or a cup of coffee from the pot. If you've known me for some time, you would know. I'm a coffee kind of guy. So I'd get a cup if you were me. But, you know. To each his own. It may take around 15-20 minutes to get everything setup, so take your sweet time and don't worry about it. Okay, okay. I know... I'm stalling. Next step is to test the thing's working. 
To test if the installed OS and tools are booting, you can go back to Xboot. Click on the QEMU tab, pick the drive you installed to and click boot :


I never did get that to work for some reason. So YMMV (your mileage may vary) ... I did however, reboot my machine and and let it boot from the USB and tadaaa: 


I tested all of the stuff I installed and when was sure everything was working I got back to my cup of joe. I thought to myself, it's nice to have a multi-tool like this in your pack of geek gear. You can have this too. Have fun experimenting with Xboot while you're at it :-)

Edit Grub2 Boot Options Easily on Ubuntu 11.04

Friday, June 17, 2011

2 comments
A few months back I shared my discovery about editing boot options in Grub2 and how there was a different way to edit the boot options on menu.lst safely. I blogged about that in this post: Missing Your menu.lst? You've Got Grub2!

Having re-installed Ubuntu recently, I wanted to document how to do it within a GUI environment with mouse-click ease. Well, not really. I mean, you do have to type in a few things to actually download the app you need to do the boot options editing for you. But, it is easy and it is inside the picture-pretty interface. No terminal commands are involved and there were no animals harmed during the making of this HowTo. So enough of the dry wit and let's get to it:

1. First, you need to download StartUp-Manager. The easiest way to do that is through the Ubuntu Software Center. You can click on the icon on the sidebar in Ubuntu 11.04:


2. Next, use the Search box in the Ubuntu Software Center to find the software you need. You can simply type in "StartUp" and Search will give you choices. StartUp-Manager is usually the first one:


3. Click on the entry for StartUp-Manager to select it. Once you click on the Install button, you'll be asked for your password:


4. Key in your password to authorize the install:


5. You'll be able to check on the progress of the download while it is running: 


6. After it is installed, where do you find it? Unlike previous versions on Ubuntu, where clicking on the Ubuntu logo will bring up a list of applications, 11.04 brings up a Search box instead of a huge list. I'm not a fan of it, but this may be easier for some people. Type in "Start" or "Startup" in Search and you should see StartUp-Manager listed first. Click on the icon to launch:


7. StartUp-Manager will perform a few tasks in the background, basically scan and create a list of items  you can configure for boot options:


8. Once StartUp-Manager is done polling the system for the information it needs, you can toggle the choices to your liking. In the sample below, I chose to shorten the Timeout to 5 from the original 10 seconds. I also chose to have Windows 7 as the Default Operating System. I'm not the only one using this PC, after all. And the wife prefers Windows 7 still. Everything else was pretty much left to the default values. After you're done, just click on the Close button:


9. StartUp-Manager will do the editing of boot options in the background:


10. Reboot and check to see if the options you set are to your liking. Just repeat the process of launching StartUp-Manager and clicking on different choices if you feel the need to change anything.

So much like everything Linux, there is a the terminal way of doing things and sooner-or-later an all-click, painless, graphical solution that some generous geek out there was kind enough to contribute to the community of users. Both methods are usually just as effective as the other. It's just nice to know that even in customizing your Linux install you are given choices. Choice matters for open-source and it's community of users are a great resource for giving every user in it that choice. Whether it be a way of doing things or different applications doing the same basic thing, there is choice. And that is where the crux of it all is!

Install Ubuntu 11.04 From a USB Stick

Wednesday, June 8, 2011

1 comments
Kingston Digital DataTraveler 101 Generation 2 - 16 GB Flash Drive DT101G2/16GBZETInstalling the CD image of Ubuntu onto a USB stcik is quite handy in certain situations. Say you need to install the latest and greatest version of Ubuntu in a Netbook. Or maybe you need to do emergency recovery and your optical drive chose the most inopportune moment to conk out on you. Or you may be like me, with shelves of burnt media and running out of storage. Whatever the case, you can try Ubuntu before you commit. It's just handy (and dandy, Joe) that you can do it from a USB stick. 
1. Download Ubuntu from http://www.ubuntu.com/download/ubuntu/download. Remember the location where you downloaded the .ISO file. Using the default location under My Documents works best, the installer will automatically scan those folders. 

2. Download PendriveLinux's Universal USB Installer from http://www.pendrivelinux.com/downloads/Universal-USB-Installer/Universal-USB-Installer.exe 

3. Launch the Universal USB Installer and agree with the terms:


4. Start configuring the Options:


5. Select the flavor of Linux you want to install using the drop-down menu on Step 1. For our case it's Ubuntu 11.04:


6. If the Universal USB Installer can't find the ISO automatically, specify the location by clicking the Browse button on Step 2. In the sample below, I downloaded it to Drive D:\ :


7. Choose the drive letter of your USB drive in Step 3. You can tick the option to format the drive before you install Ubuntu on it:


8. Click on the Create button to start installing:


9. Confirm your options by clicking on Yes on the next notification:


10. Grab a cup of joe while you let the installer do it's work:


11. You'll see another window where the status is tracked. Caution should be exercised, as this can be hypnotic for geeks like me:


12. And we are done!


Now, reboot your computer, go into BIOS and choose the options to boot into USB devices before the hard drive or optical drive. You can use the 'Live CD' in the USB stick to try out Ubuntu or choose to install it to your hard drive from there. Enjoy with a second cup of coffee!

Grumbling Geyser

Thursday, May 19, 2011

0 comments
In a spiteful, vengeful act of spring clearing my desk drawer, guess what I found? I had to stop scorching the earth to admire a relic from the good past. I found an old copy of Hoary Hedgehog! I've actually been around since Warty Warthog, but I don't have any CD's anymore. I must've given them away. I was always on a frenzy back then, ordering like mad, wanting to give away the CD's to leery friends who started avoiding me. Well, anyway, I'm glad I kept a copy around just for old times sake.

Ah, those were the days! Way before they started scheming to go by the alphabet for the order of the version nick names. Back when downloading anything close to the size of a full CD meant days on end on a dial-up connection. Frustrating was it to find your download interrupted by something as trivial as a call coming in. Back in dial-up age that meant starting over. So when a friend told me that there was this distro that was shipping CD's free-as-in-beer to anyone anywhere in the world, I was esctatic! Back in those days, I'd order a pair of discs the day they announce the release and eagerly await the three weeks it would take to get them in my sweaty palms.

It's wonderful to romanticize about the old days. Sad to say as the years pass I begin to be less enthused and more bemused. Everything goes by so fast these days. Probably because i have so much to do and only 24 hours every day. Along with that dilemna comes less time in front of the computer. Well, not really. I meant I spend more time on the computer now than 5 years ago, except these days it tipped over to work related things instead of tinker time.


With Natty Narwhal barely a few weeks old and Oneiric Ocelot peeking over the horizon, I tend to wonder if the whole scheme of releasing a new version every six months is still relevant. Probably because by the time I had  afforded myself enough use-time to get comfy with one release, here comes another. And there something to be said about really customizing a linux install to the tweaks that you want. I mean when you hit the sweet spot, it's just in time for the next release. Reminds me of "if it ain't broke, don't fix it" and how a lot of long-time linux users will find a version that is stable and feature-sufficient enough for them and stick with it until they really have to upgrade. I mean really need to.  Like probably when the repositories for that version already go offline kind of have-to.

UBUNTU Geek Technology Produc Internet Dark T-Shirt by CafePress
So gleaming from that wisdom and after weighing the history I've had with Ubuntu, I've decided to just go with what works for me. I installed Natty, but then I couldn't get used to Unity. I will go back to Maverick and will probably stick with that until I really need to (have to) move on. Maverick was the last thing I got excited about and it worked great with the tweaks that I added. I'm starting to feel old already just admitting that I prefer the older stuff. I mean I'm starting to love older things all of a sudden. Someone send me an Ubuntu shirt with the old logo!!!

Missing Your menu.lst? You've Got Grub2!

Tuesday, June 15, 2010

0 comments
If you're like me, you'd have been taking advantage of the popularity of Virtual Machine software to try out new Linux distributions. Or if you have a dual-boot (with Windows on one end and a Linux favorite on the other), you've been content at upgrading Linux from version to version without doing a full reinstall. Then there comes the confusion when doing a fresh install and you realize you don't know what that heck happened to the /boot/grub/menu.lst file on your Grub.

Since Ubuntu 9.10, Grub 2 has become the default boot loader. If you are looking for the menu.lst file that used to be what you edited to specify which OS to boot into by default, then I'm telling you it is gone. In Grub 2, the file that closely resembles its functionality is /boot/grub/grub.cfg, but that isn't supposed to be edited. You need to edit something else and then update grub.cfg. Here's how to do it in Ubuntu and Linux Mint, 2 of the distros I usually end up installing.

After installing Ubuntu or Mint and rebooting for the first time, take note of the menu entries. They usually follow the following pattern:

Ubuntu, linux *kernel_version_here*
Ubuntu, linux *kernel_version_here* (recovery mode)
Memory Test (memtest86+)
Memory Test (memtest86+, serial console mode)
Windows OS

Here's a sample of how it looks like on my desktop, Linux Mint as it were:


Now note that the default entry is "0", which points to the first option in the list above. That is to say your linux distro in normal mode is "0", your linux distro in recovery mode is "1" and so on. Counting from 0, Windows is then option 4 as listed above. Now as a sample, let's edit it so it boots to the Windows OS by default:

1. Open a terminal and type in "sudo gedit /etc/default/grub" (without the quotes). Type in your root password when asked:


2. Edit the entry GRUB_DEFAULT=0, replacing zero with the option you want to boot by default. In our sample way above, Windows is number 4:


3. Save the file and close it.

4. To update /boot/grub/grub.cfg with the new settings, go back to the terminal and enter the command “sudo update-grub” (without the quotes). Type in your root password if asked:


5. Reboot to test.

There you have it. Now if you'd want to go further and tweak the heck out of Grub2, you can go to the following links for very detailed instructions:

Ubuntu Grub2 Community Documentation - https://help.ubuntu.com/community/Grub2
Ubuntu Forums Grub2 Tweaks Thread - http://ubuntuforums.org/showthread.php?t=1287602
Ubuntu Forums Grub2 5 Common Tasks - http://ubuntuforums.org/showthread.php?t=1302743


OSRI Weekend

Saturday, February 27, 2010

0 comments
Microsoft Windows 7 Home PremiumFor those unfamiliar with the term, OSRI is a acronym we use in my line of work. I means Operating System Re-Install. I know, I know. Geek language is just so darn rife with acronyms it sounds like an alphabet soup.

Well, this weekend I embark on a regular round of OSRI. I tend to do it every few months just to start anew. I guess this has been one of my longest runs. I haven't done an OSRI since August. I used to do it every three months or so. I've stayed too long probably because for the first time in many years I actually enjoyed Windows. Windows 7 was actually pleasant. I usually have my computer dual-booted and have been equally happy with Ubuntu 9.04. Even when 9.10 came around, I didn't feel I needed to upgrade. I guess it comes with age. When you get older, you tend to stick to what you like. No more listless multi-boot experiments.

This isn't a joke. Seriously. Just a few years back, I actually maintained 5 operating systems at any given time on my machine. I nominally had Windows 2000, Windows XP, Ubuntu, Mandrake (now called Mandriva) and Xandros. I dabbled on even more Live distributions, burned whatever caught my eye in Distrowatch.com. I had to give it up after going through the pain of having to maintain updates, security and otherwise, on 5 different operating systems. Add to that the fact that at the time, I only had dial-up. Heck, those were the days.

So this weekend I dive into another round of OSRI to rid my system of all the crud that got accumulated in the last 6 months. It's going to be a geeky weekend for me. I'm planning to install Windows 7 and Linux Mint 8. I've been meaning to install the latter from when it launched. Now I'm really going for it. My only problem now is the space on my hard drive. After almost a year, the Seagate 500 GB drive  I bought now has only 84.6 GB left of free space. I think I need to rethink my storage strategy. But for now, just installing will have to do.


GameTap - Get Unlimited Access to Hundreds of Games

Via And NVidia Launch Mini-ITX 2.0

Sunday, June 8, 2008

0 comments
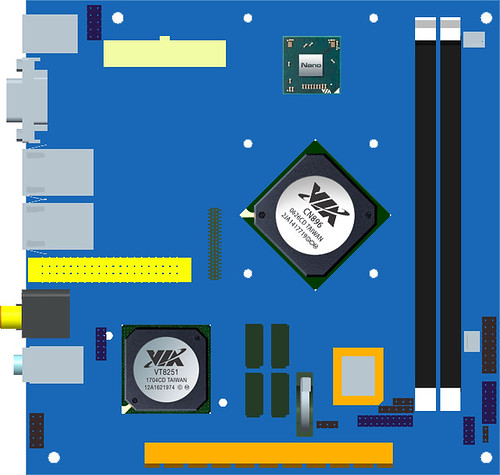
As was previously announced, Via and Nvidia officially came out and formally presented their partnership to produce the most affordable Vista-capaable platform. PC Perspective ran a story with in-depth information on the expected performance of the upcoming platform. They even posted a picture of a sample board, with an 8600GT strapped on to the PCI Express slot. Digitimes also ran a story on the announcement, highlighting the two's support of Mini-ITX 2.0. Intel's entry to the Mini-ITX niche has been observed as "limiting", having a very basic graphics subsystem and no provisions for upgrades. Seeting up an official spec for Mini-ITX 2.0 is seen by analysts as Via's play to keep its dominance over it's Mini-ITX turf while attracting more of the mainstream market.

Mini-ITX 2.0 seeks to up the ante by allowing consumers more mainstream expansion choices while maintaining the 17 x 17 cm form factor. In more detail, 2.0 will require the following feature set on boards:
When compared to the current Mini-ITX offerings of Intel, these specifications are a boon for anyone seeking a low-cost solution for multimedia and gaming on the Vista platform. Clearly this strategy can open up a niche for Via in the mainstream market, opposite Intel's pushing the Atom platform (and their other Mini-ITX offerings) in the low-power niche that Via traditionally dominated. Now, only the market will say who's strategy will eventually pay off. Who gains more is will eventually be dictated by the consumers. I'm hedging my bets on Via gaining a bit on the mainstream market.
Free Ground Shipping on Orders $125 or more at EpsonStore
Stop PC Crashes with WinZip System Utilities

Copyright © 2011 Tech Throes | Splashy Free Blogger Templates with Background Images, Trucks